Working with printed circuit boards means dealing with a lot of information, e.g. in the form of component properties. In the following, two important information dialogs are introduced:


The difference between components and non-components is that components are strictly defined by the ODB++ format while non-components is our term for the collective category of the remaining objects that are no components. To invoke both dialogs you have to select one or more objects in the visualisation first, then you can right click and select "Properties" to get to the dialog containing a large variaty of information like the part name, position, height, pin count (with an own pin overview tab), etc.


The difference between components and non-components is hardly visible and only is due to the fact that with non-components you have additional tabs based on categories (lines, pads, arcs, surfaces, texts) to help you find the object you are looking for more easily. To invoke the Attribute Histogram dialog you have to right click on the concerning layer in the layer panel and select "Show Attribute Histogram" to get a list of all component attributes and their respective values.
If you have more than one layer activated for visualisation and you use the mouse gesture to get to the Attribute Histogram dialog, it will always show you the data for the most activated layer of your layer stack up.
You can find the Testpoint Assign Tool under Plugin >> Assign Testpoint Attribute.
This tool helps to find and mark testpoints in a layout which could be defined via multiple non standardized attributes. Marking them with this tool then helps to standardize this and prepare the layout for following tools (for example the DFT Preperation).
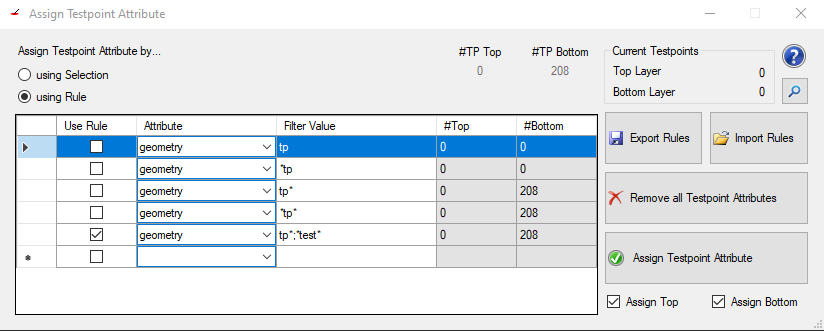
On the top left you can switch between using the current selection or a set rule to find the testpoints and assign the test_point value.
When choosing rules you can add another rule by checking the checkbox of the lowest row in the current listview and then fill out which attribute should be tested and what value needs to be set in said attribute.
All attributes are listed in a simple drop down menu. The Filter Value then has to represent the value of the attribute. Wildcards are allowed when searching for attribute values. The image shows for example all ways to search for "tp" in the "geometry" attribute:
Also it is possible to search for multiple values of the same attribute as shown in the last row. Simply seperate the values with a semicolon.
Boolean attributes do not need any value since their existance already means they are set.
To remove a rule simply select the whole row by clicking on the left most column of the row you want to delete (left of Use Rule) and press the "delete" key on your keyboard.
Checking a rule will select all found possible testpoints of the job (the checkboxes Assign Top and Assign Bottom change the selection depending on the check state of them)
On the top right side there is an information panel showing:
Export Rules exports the currently set rules to a xml file on selected location on the machine or in a cloud
Import Rules imports rules from a file either from the machine or from a cloud
Remove all Testpoint Attributes removes the "test_point" attribute from all pads of the job
Assign Testpoint Attribute adds the "test_point" attribute to either the currently selected pads or the pads found by the selected rule (handled by the radiobuttons "using Selction" and "using Rule")
Assign Top is a checkbox that when unchecked the "test_point" attribute will not be set for the pads on the top layer
Assign Bottom is a checkbox that when unchecked the "test_point" attribute will not be set for the pads on the bottom layer
To find possible testpoints the attribute histogram is a good way to start.
To increase comprehension when to best use these previously introduced dialogs, here is a case example: Let's assume you want to do a test or let someone do a test and thus need to select certain test points and export the list to e.g. MS Excel.
There are two ways to select something:
Method 1:
Method 2:

The next step is the same for both methods. Once you have selected the needed properties by using one of the methods above, you have to call the "Selection Buffer via "Start » List". It lists all the attributes of your selected components your test adapter supplier would need to do his work. The list shows the layer, object, type, position x/y, and the net you can test with the individual test point and can easily be copied by right-clicking and selecting "Copy data to Clipboard" and be pasted anywhere you like.