
The Quick Overview panel can be found in the left bottom corner of PCB-Investigator right below the Layer Stack Up panel. Besides, an overview over the current visualisation, whereby the red rectangle symbolises the current visible range, it offers an overview over components, nets, properties, an error log and the possibility for quickly editing the properties of a selected object.
Working with nets, you can select the nets tab to get a tree structured overview over all nets. Every net can be expanded to see, which pins are connected to it. In addition to that you have several selection methods via right click like selecting all child-objects and assigning a self-defined colour.
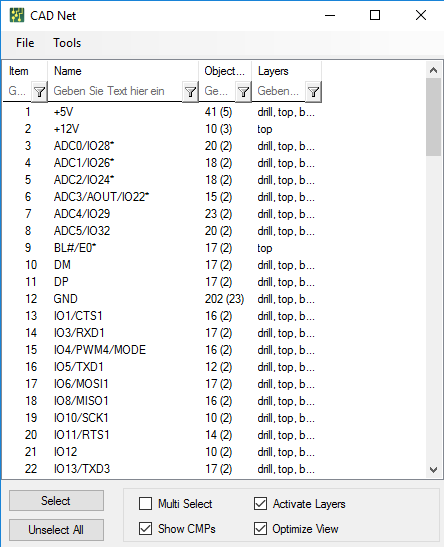
You can find the Net List dialog under Start » Net List. Similar to the Quick View panel it shows you how many objects are connected to a net and on which layer a net is present. Unlike the Quick View the Net list however doesn\'t show the pins.
Below, the checkboxes at the bottom of the dialog are explained in detail:
Usually you can only select one object at a time while a new selection overwrites the previous one, multi select however allows you to add any number of objects to your selection.
Usually only the net is selected, Activate Layers automatically activates all layers the net is present on.
Show CMPs also selects all components connected to your selection.
Similar to the draw only selected option Optimize View makes everything besides your selection transparent.
As almost everywhere in PCB-Investigator here you also have several additional options via the context menu which you can get to by right clicking on a net. For example, you could assign special colours to certain nets such as assigning the colour yellow to all high voltage nets. These Colour Settings can even be ex- and later imported via File » Save/Load Colorsetting which is especially useful if you are working with external designs. For example, having to review an external design which you customised with an individual colour scheme only to have to recheck an updated version the next day. Normally your changes would be lost, but with PCB-Investigator you simply can load your colour scheme again.

The Nets of Component dialog can be found under developer » Nets of Component. It shows all the nets a sleceted component is connected to and offers the possibility to exclude certain nets like ground or powerlines (which occur everyhwere) for better clarity or include specific ones, for example, if you are only interested in nets with a certain functionality like USB (in this case you would have to either know the net name(s) or it has to be apparant on the netname for examply by a prefix like "usb_").