 |
The Creepage Analysis in PCB-Investigator calculates the shortest distance from the outer edges to the conductive components to one another and to the outer egde of the board. This also considers uncoated drill holes (e.g. mount drill holes) and indentations, which otherwise would be too time consuming to calculate manually. |

Creepage Analysis can be found in the "Analysis" tab. The following picture shows the main view after clicking the "Creepage Analysis" button. As you can see, there are three different tabs.


On top of the "Net to Net" view, you can find two drop down menus to select two nets, which have to be analysed. The buttons on the right side of the drop down menu may be used to automatically fill the drop down menu with corresponding nets you are currently selecting on the board design.

If you are using the button in the "Net Group to Net Group" tab, the button click will set the net group name (the net has to be included in a net group).
The options "outer/inner distance" and "Allow creepage flow via the board outline/ routings" (below) are the most important ones.

Allow creepage flow via the board outline/ routings
This option allows the calculation to consider the board outline and routings. So using this option, it allows to check inter layer distances as well.

NOTE: This option is the main difference to the "Net Groups" calculation, where only distances between nets for each layer separately are calculated.
![]()
Outer Distance & Inner Distance (max values)
To decide the proper distance, you have to consider the important parameters for the calculation.
These parameters are:
To connect these parameters there are several tables in the internet. The following image shows an example table.

Using tables like this, it is much easier to decide the proper distances for your cases.
For example:
Known
Assumption
With these three parameters, it is easy to get the "Inner Distance" of 1.0 mm and the "Outer Distance" of 5.6 mm.
As shown in the picture above, the corresponding DIN Standard in this example is DIN EN 60664-1.
At the bottom of the main view image there are further options.

Outline Calculation Precision
If a creepage flow is possible using the board outline, it has to be calculated in small iterations. A line or arc could be mathematically described in nearly infinite points connected by small lines. We have to limit the amount of points, so that the calculation for the shortest way can be finished within an acceptable time. In order to determine the amount of points (granularity), there are the parameters "Tolerance Lines" and "Tolerance Arc", after which distance lines and arcs are to be divided into points. The figure below illustrates this procedure.

Maximum creepage flow steps
The "maximum creepage flow steps" option allows you to influence the calculation directly. This number defines the number of steps the creepage flow is allowed to do.
For example:
You want to measure between Net/Group A and Net/Group B with a minimum acceptable distance of 5.00 mm.
With e.g. 2 allowed creepage flow steps, you allow the creepage current to go from the Net/Group A to the Net/Group B via an independent Net/Group C.
The flow distance inside the Net/Group C is not counting to the total distance, as the Net/Group C is a conducting surface. In this way, the creepage distance might be reduced compared to the direct distance between Net/Group A and Net/Group B.
So, you allow the calculation to make the creepage flow look like this:
Moves from a Net of Group A over a Net of Group C to a Net of Group B

In this example the creepage distance between Group A and Group B is reduced from 5mm to 4mm when going over Group C elements!
Result
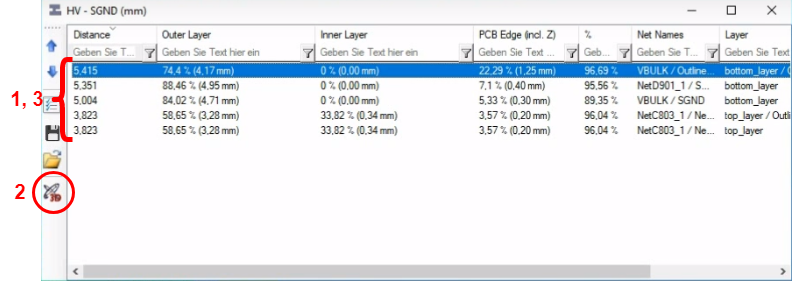
The image below shows a possible result of the calculation.

The following is a detailed analysis of the red marked entries. These two entries are calculated with the "Maximum creepage flow steps" of 2.
(The following description shows just the difference to the "Net to Net" tab)
The difference of the drop down menus lies in the fact that nets are replaced by net groups.
If the "Net Group" drop down menu in the "Net Group to Net Group" tab is disabled, there is no net group to use. So, you have to create net groups first. This can be done in the "Net Groups" dialog.
Rules

Important: If a ruleset is set, the current "Inner/ Outer Distances" shown on the view will be ignored, if distances are set in the rules themselves.
To generate net groups see here
(The following description shows the difference to the "Net to Net" tab)
"To Outline" can be used to check the distance of a "Net Group" or a "Net" to the outline of the PCB.

If a netgroup is selected in the control field, it checks whether there is a rule that contains the selected rule group for the netgroup selected above. If such a rule exists, the distances which are stored in the rule are used for the calculation. If a net is selected instead of a netgroup in point "1", the system first checks whether the net belongs to a netgroup. If this is the case, the procedure is identical to the sequence with a netgroup. If the net is not in a netgroup, the entered distance is used for the calculation.
2D View and 3D View
2D View
After the calculation is finished, the result may look like this:

Selecting one of the results will show you the area with a resulting line in 2D. It also shows the name of both nets, which cause the result entry.
Sometimes it can be hard to detect the issue on 2D. For this reason, it is possible to present it on 3D.
To show the result 3D, follow the instruction below.
3D View

Now a new window opens with the current design (it may take a few seconds).
On bottom left of the new created window, there are several options.
Enable the green bordered ones.

Use the result window for the following steps.

Click the "Select Nets" to activate nets in the separate window. Now the 3D view should be ready to inspect. It may look like the following image.
