
- This button creates the probes according to the rules defined in the Test Setup (A). If probes already exist, you’ll be asked if you want to keep and only supplement them, or if you want to delete all probes that are not fixed bevor creating new ones.
Additional Rules:
- The first probe per net will be given “Probe Access = Forced”
- If more than one probe is needed for a net (see “Net Setup (D)”), those probes will have “Probe Access” set to “Alternative”
- If “Use max. Test Resources” is set to false in Test Setup (A), probes that go beyond the needed number will have “Probe Access” set to “No”
- If a component in the net needs 4-Wire-Measurement (“Component Setup (B)”) and only one probe is possible in this net, there will be a second probe created at the same location as the first one
- If a fixture probe location is too close to a component, the next smaller needle size is used. If the smallest needle is still too close to a neighbor component, no probe will be created.
- The probe type depends e.g. on the component type (SMD/THT of the “Component Setup (B)”) or the Component Reference name (“TP Reference Filter List” in “Test Setup (A)”)
- Pad and hole sizes are taken from the layout
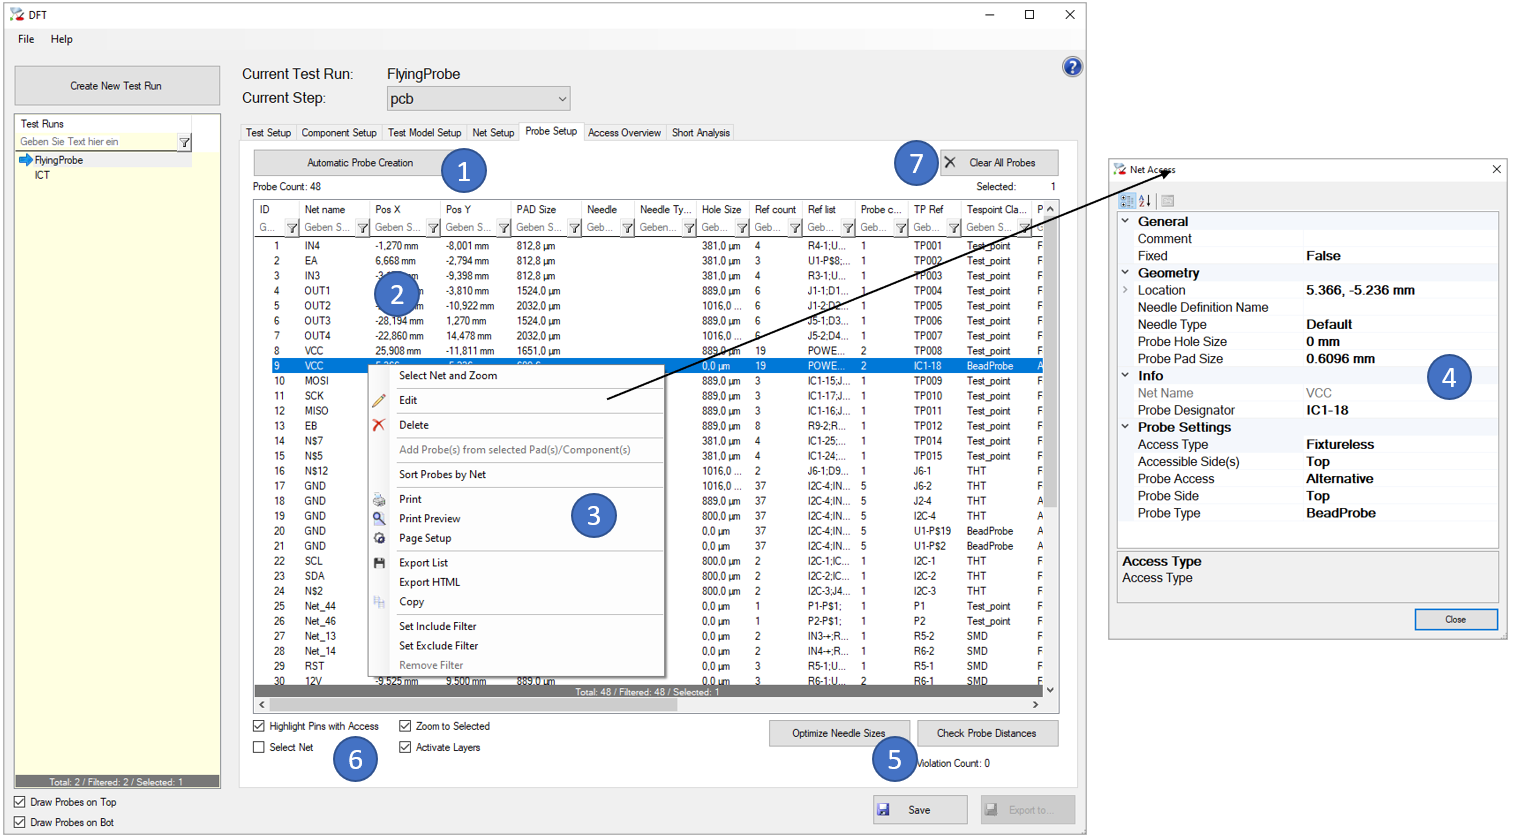
- The list shows all probes with their nets, locations and properties.
- In the context menu some important functions are easily accessible (e.g. Delete) or the “Edit” (4) dialog can be opened.
- In the “Edit” dialog, you can change following properties of the selected probe(s).
- Location: Board location of the Probe
- Probe Designator: Probe Designator (e.g. TP100) to which this probe belongs
- Access Type: Access Type (Fixture/Fixtureless)
- Accessible Side(s): Accessible Side(s) for this probe (Top/Bot/Both)
- Probe Side: Probe Side (Top/Bot)
- Probe Type: Probe Type (TestPoint, THT, VIA, SMD, …)
- Probe Access: Probe Access Type (Forces/Alternative/No)
- Fixed: Probe location is fixed and Probe will be kept if probes are recreated
- Needle Definition Name: Name of definition of the needle. Must match a value in the 'Available Needles' section of the Test Setup (A)
- Probe Pad Size: Pad Size of this Probe
- Probe Hole Size: Hole Size of this Probe
- The "Check Probe Distances" button checks the distance between the probes in the list according to the “Minimum Distance between Probes” parameter of the “Test Setup (A)”. Rule violations will be highlighted in red color and additional information in the “Violation” column of the list. The "Optimize Needle Sizes" button trys to find the best possible needle sizes, therefore the "Minimum Distance between Probes" parameter of the “Test Setup (A)” is used. The algorithm trys to keep the largest possible needles, e.g. by setting two close needles both to 75mil instead of one to 100mil and the other to 50mil.
- Visualization options to highlight pins with probe access or select/jump to selected probes
- Clear the list and delete all probes