Testcoverage Report use the results of machine analysis for reporting the test efficiency and production yield for the complete PCB.
Testcoverage Report use the results of machine analysis for reporting the test efficiency and production yield for the complete PCB.

You can use AOI/AXI Analysis and DFT Preperation to generate machine results to include them in the testcoverage calculation.
All saved results possible to select for single machines, depending to the machine you have some filters e.g. AOI THT machine use only results with THT filter off.
In the Overview you find some tab pages, at the end the Test Contribution Chart shows you which machine has how much influence on the check:

On the left side you can change the PPVS selection to display the diagram for the selected type.
1) how much components not tested
2) multi machine tests mean components found in more than one machines result (e.g. in AOI and ICT results)
3+4) AOI SMD and AXI have here 0 %, because the results overlap with other machines and included in 2)
5) ICT has some component only tested by this machine.
There are options to export an html report and save and load the settings to share them with others.

There are many filter and sorting options, all components with types and individual test coverage listed. You have also the option to change the table by filtering single machines e.g. check the result without an AXI machine or what happen if you remove the ICT machine.
If you want to try the exported html file check this example:
The importand formulars for test coverage report are:

We use the parts per milion values (PPM) for precense, polarity, value and soldering per pin to sum up all results and devide them bei the sum of all PPM values.

The production yield is only depending to the parts per milion values (PPM), it is the product of all "bad parts".
The top block of the machine page in the report containing some important values:

Components Checked: Percent how many of possible components are checked with this machine e.g. the AOI is placed after SMT soldering and cannot check THT components. If some of the components in shadow of other components the value is lower then 100%.
Covered Components: This is the positive result with higher coverage value then 0, this value gives you a short overview like a table filter >0.
Pins checked: Maybe the machine cannot check all pins, the percent value is depending on the machine type and analysis results e.g. a AOI machine cannot check cooling pins under the body of the packages.
Covered Pins: This is the positive result with higher coverage value then 0 for the pins.
Coverage Presence/Polarity/Value/Soldering: The overview value for all results or "-" if the machine cannot check this value.
Net Access machines support electrical tests for value and need testpoint definitions. In general this is results come out of the DFT Preperation see DFT manual
At the top area there is a overview:
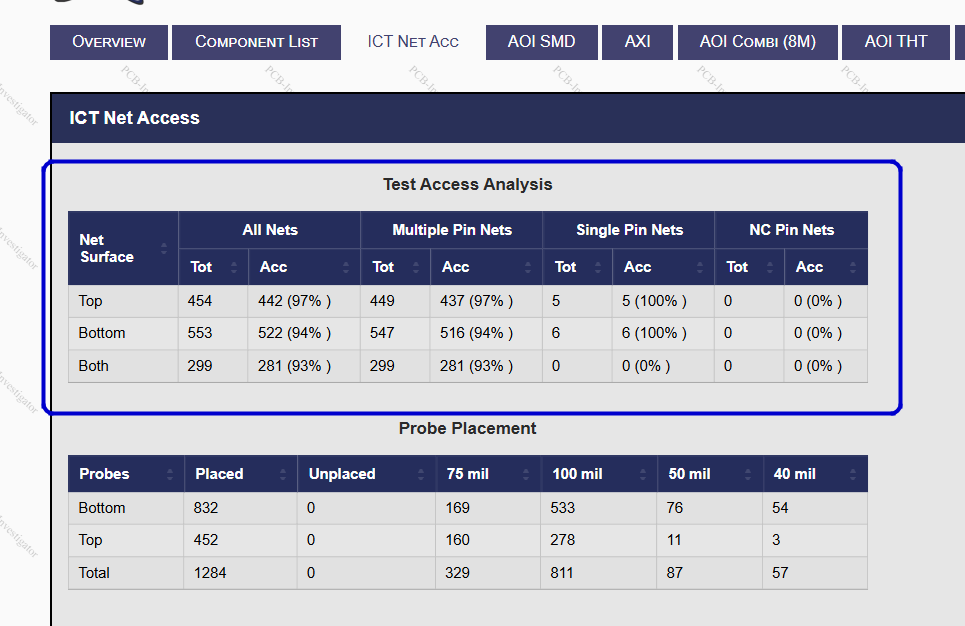
The Test Access Analysis gives you an overview over all possible net contacts. The entries contain optional probes from the DFT session.
In the Probe Placement there is a overview of defined probes for the machine exports, this contains only forced probes no optional/alternative probe settings.
To open the Machine Organizer use the Edit menu and click on "Machine Order".
You can organize your production street with different machines:

1) Use default machine order with SPI-, AOI-, AXI-, ICT-, BScan- and FPT-Machines
2) Add new machine with own settings or from the template list.
3) Remove selected machine from the machien order list.
4) Move selected machine to the left.
5) Move selected machine to the right.
6) OK close the dialog and save the new machine order.
Each machine should be configurated with parameters to start an analysis and get check information from there. E.g. you can have an AOI machine which can test some components found in the AOI Analysis, or you have an AXI machine with specific settings (e.g. test only BGAs and DPack components) this creates an analysis result and the machine definition define the machine connection to the test result. You can start the analysis for each machine directly with the small button beside the drop down "Selected Result".
Each Machine has specific options , you can open them in the context menu of the machine:
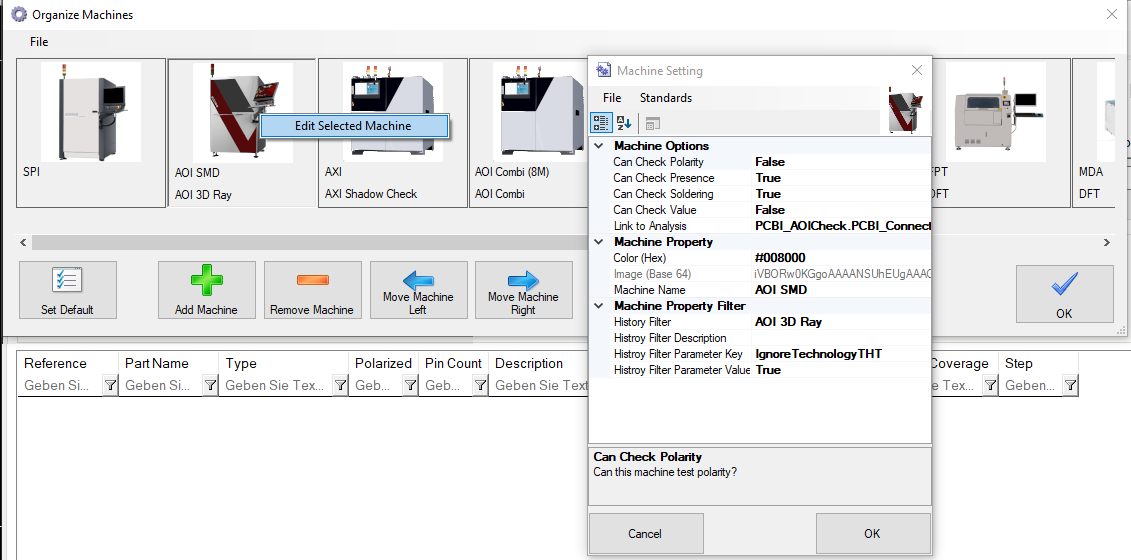
Each machine can check Polarity/Precence/Soldering/Value individually.
Use a Link to Analysis for direct opening the connected Analysis which results are readed from the history.
To filter the History and find the connected Results there are some Filters e.g. the name of the machine and maybe specific filter (here Ignore Technoloty THT = true).
Depending on your production quality, the PPM values for the production line defined in the Options.
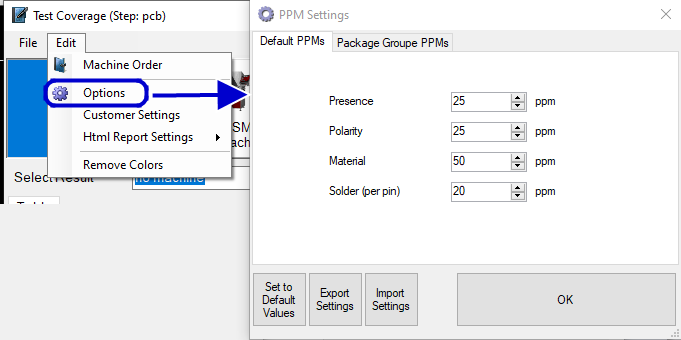
You can Modify the default values or set specific defect values for each Package Group e.g. your Chip values better like QFN soldering then change the PPM value for one Package Group. This values modify the Porduction Yield directly and the Test Efficiency in small parts (see calculations above).
With the option "Calculate values regardless of the capabilities of the machines" the percent values has the same basis (real PCB data) or use the machine results for calculation (e.g. only checked components of the analysis result like count BGA + QFNs in AXI analysis).
We are working on new features, for beta users here are some details:
1. Easy switiching active machines:

2. Summary in single Machines:

3. Summary in Overview Tab:

You see some special cases e.g. for Polarity the machines do test some components without polarity marker this means you have more tests as needed.
For Value tests you see the machines check 84 of 96 components, but the design contains 205 relevant components. The machine results are ok with 87.5 % but for the complete board this is only 40.98%
The Coverage Score is a helpfull scoring value to compare different machine settings. The calculation is Percent All (P+P+V+S)/4 without unit.